

A vehicle lift changes the pace of a shop. It puts brake work, suspension repairs, underbody inspections, alignments, and collision-related mechanical work at the right height - but only when the lift is installed on a foundation and electrical system built to carry the load. Knowing how to install vehicle lift equipment starts before the delivery truck arrives.
This is not a job to rush because a bay is open. A poorly placed column, weak concrete slab, incorrect anchor, or undersized electrical circuit can create expensive downtime and a serious safety hazard. Use the lift manufacturer’s current installation manual as the controlling document, follow local building requirements, and bring in qualified concrete and electrical professionals where the job calls for them.
How to Install Vehicle Lift Equipment: Start With the Building
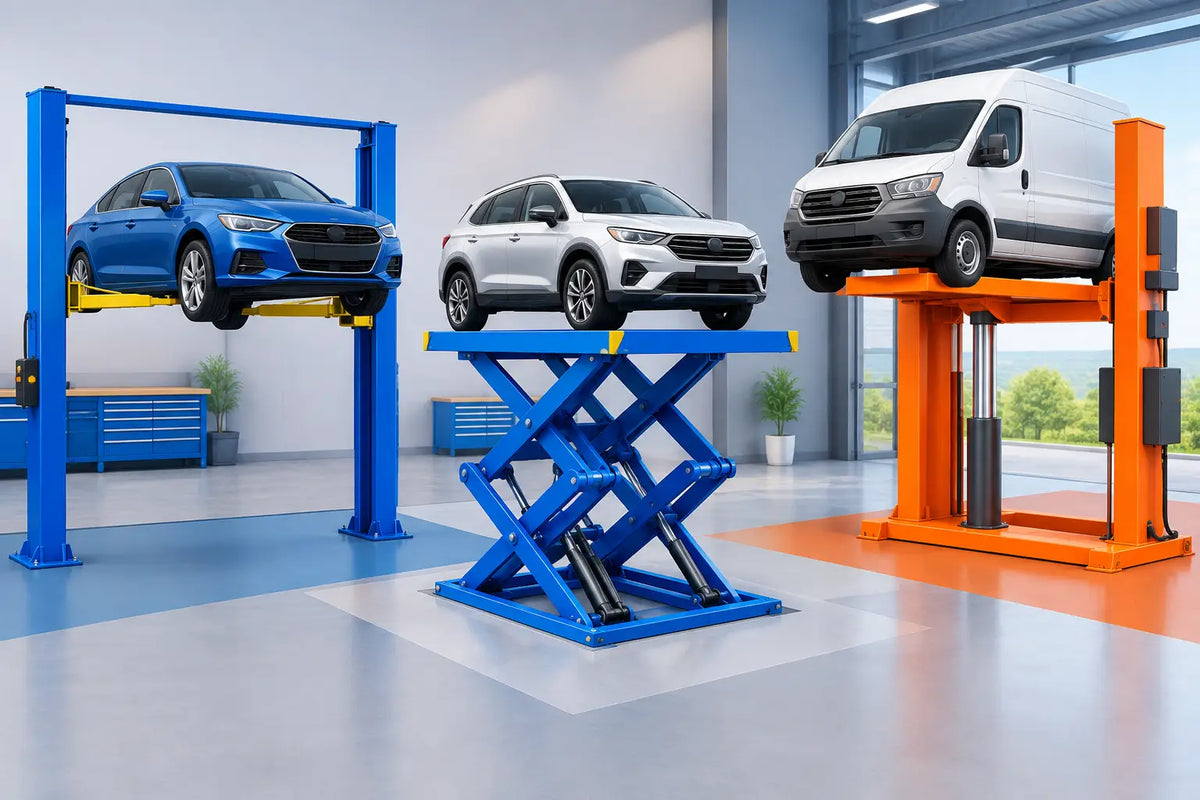
The lift model determines the site requirements. A two-post lift needs properly rated concrete at each column location, adequate overhead clearance, and room to open vehicle doors and position arms. A four-post lift needs a long, level footprint and space for ramps, runways, and approach angles. Scissor lifts have their own demands, especially when installing a recessed unit that requires excavation, drainage planning, and a finished floor that remains level with the lift platforms.
Do not assume a thick-looking floor is enough. Verify the slab depth, concrete strength, condition, and reinforcement against the lift manufacturer’s specifications. New slabs may need a full cure period before anchors are installed. Existing floors need a closer look for cracks, patch repairs, expansion joints, soft spots, and signs of settling. Never set a lift column over a crack, seam, drain, trench, or compromised repair area unless the manufacturer explicitly approves that condition.
Ceiling height matters just as much. Measure from the finished floor to lights, garage door tracks, HVAC ducts, sprinkler lines, and structural steel. Then account for the tallest vehicles your shop plans to service. A lift that clears a pickup at the locks but puts the roof into a light fixture is not a usable setup.
Before equipment arrives, mark the proposed bay with tape. Pull a typical vehicle into position, open the doors, roll a tool cart around it, and check traffic flow from nearby bays. A few inches can determine whether technicians work efficiently or fight the layout every day.
Choose the Right Lift for the Work You Actually Do
Capacity is more than the number printed on the nameplate. Your lift must handle the heaviest vehicles you expect to service, including work trucks, loaded fleet vehicles, and long-wheelbase SUVs. It also has to fit their wheelbase, lifting points, width, and roof height.
For general mechanical and collision-shop work, a two-post lift gives clear wheel and underbody access. Symmetric and asymmetric arm configurations change how the vehicle sits in the bay, so review the door clearance and center-of-gravity requirements before choosing. Four-post lifts work well for storage, inspections, wheel service, and alignment-related setups when paired with the proper accessories. Scissor lifts are a strong option where floor space, low drive-on height, or open-sided access matters.
Match the equipment to the workflow, not just the price. A lower-capacity lift that forces your shop to turn away profitable work costs more over time than a properly specified system.
Prepare the Electrical and Air Requirements
Most professional vehicle lifts use an electric-hydraulic power unit. Confirm the required voltage, phase, amperage, breaker size, disconnect method, and wiring details before installation day. Common shop lifts may be configured for 110V or 220V single-phase service, while larger equipment can require three-phase power. The nameplate and manufacturer manual decide the requirement - not what happens to be available near the bay.
Have a licensed electrician install the correct dedicated circuit and disconnect where required by local code. Keep the power unit location accessible for service, but protect it from vehicle traffic, wash-down areas, and damage from moving carts. Route wiring in approved conduit or other code-compliant protection. Do not run temporary extension cords to operate a permanent lift.
If the lift uses compressed air for safety locks or other functions, provide clean, regulated air at the specified pressure. Water and debris in an air line create avoidable lock and control problems. Install filtration and drainage consistent with the equipment requirements and your shop’s air system.
Set Columns, Runways, or Platforms Precisely
Delivery crates can make installation look straightforward, but lift assembly is a measured process. Start by inventorying every component against the packing list: columns or scissor assemblies, arms or runways, power unit, hydraulic hoses, cables, pulleys, anchors, hardware, safety components, and manuals. Report missing or damaged items before the installation crew gets too far into the work.
Lay out the lift using the manufacturer’s dimension sheet. Snap clear reference lines on the floor and measure diagonally to confirm the layout is square. For a two-post lift, column position and orientation affect arm reach, vehicle balance, and access through the bay. For four-post equipment, make sure the runways are level with each other and that the approach is clear for low-clearance vehicles.
Raise upright components with suitable lifting equipment. Columns are heavy, awkward, and capable of causing severe injuries if they shift. Keep nonessential personnel clear, use rated rigging, and do not improvise with damaged straps, undersized forklifts, or unstable blocking.
Once the columns or platforms are positioned, check plumb and level before drilling. Small errors at the base can become cable tracking, arm alignment, or runway-level problems later.
Anchor the Lift Only as Specified
Anchors transfer the lift load into the concrete, which makes them one of the most critical parts of the installation. Use the exact anchor type, diameter, embedment depth, torque value, and hole-cleaning procedure specified by the lift manufacturer. Substituting a similar-looking anchor or skipping hole cleaning is not an acceptable shortcut.
Drill holes straight and to the required depth. Remove drilling dust completely, install the anchors, and tighten them with a calibrated torque wrench. If an anchor spins, will not achieve torque, lands in bad concrete, or is too close to a crack or slab edge, stop and resolve the issue before moving forward. Do not attempt to hide a problem with extra washers, filler, or a larger impact gun.
Some installations require shims to bring columns into plumb on an uneven floor. Use only approved steel shims and follow the manufacturer’s limits. Never use wood, loose hardware, or stacked material that can compress or shift under load.
Connect Hydraulics, Cables, and Safety Systems
Install the hydraulic power unit, hoses, fittings, equalization cables, chains, and pulleys exactly as shown in the installation documentation. Keep hydraulic lines away from pinch points, sharp edges, hot surfaces, and tire paths. Clean connections before assembly and avoid over-tightening fittings, which can damage sealing surfaces.
For cable-operated lifts, cable routing and tension must be equal. Uneven tension can cause one side of the lift to rise differently, wear pulleys prematurely, or prevent the safety locks from engaging at the same height. Follow the adjustment sequence in the manual instead of adjusting by sight alone.
Safety locks are not optional accessories. Confirm that each lock engages positively at every designated position and releases correctly through the specified control method. Check all hoses for leaks and make sure protective covers, hose guards, arm restraints, toe guards, and cable guards are installed before operation.
Test the Lift Before It Enters Service
The first lift cycles should be slow and controlled. Run the equipment through its full travel with no vehicle on it, listening for binding, cable noise, hydraulic leaks, misalignment, or uneven movement. Lower the lift onto the mechanical locks, then raise it slightly and release the locks according to the operating procedure.
Next, test with a vehicle that is well within the lift’s rated capacity. Position the vehicle using approved lifting points, verify arm pads or wheel contact, raise it only a few inches, and perform a stability check. If the vehicle is stable, continue upward while watching clearances. Test the locks at working height and confirm that lowering controls operate smoothly.
Before putting the bay into normal use, train every technician on the lift’s specific controls, lift points, capacity limits, daily inspection routine, and lock procedure. Post the operating instructions and capacity information where they can be read from the controls.
Build Inspection Into the Shop Routine
Installation is only the first part of safe lift ownership. At the start of each shift, inspect for hydraulic leaks, damaged cables, loose anchors, worn arm restraints, bent pads, unusual noises, and safety-lock problems. Keep the floor around the lift clear of loose hardware, oil, water, and tools that can interfere with vehicle positioning.
Schedule periodic inspections and maintenance based on the manufacturer’s requirements, the intensity of shop use, and applicable safety rules. A busy collision center lifting vehicles all day needs a tighter maintenance discipline than a low-volume restoration bay. Record repairs, inspections, and adjustments so problems are caught before they turn into a shutdown.
A correctly installed vehicle lift gives your technicians faster access, cleaner repairs, and a safer working position. Get the foundation, layout, anchoring, and testing right from day one, and the lift will earn its floor space on every job that rolls into the bay.